
Privacy and Security of your information and private stuff is the matter of wonderful problem in today's time where people are indulging much more in the on the internet virtual world. How To Set Your Profile To Private On Facebook: Individuals spend a lot of their spare time on the social networks websites and the one who has taken the social networks by tornado is Facebook. Over 1 billion are involved in Facebook regardless of the age. Here, we share our images, play games, calls, video clips, chat with other people and so forth.
Yet you will certainly never ever understand when an unknown person could get involved in your account and take your pictures, videos, various other personal details and use them versus you. Hackers may conveniently hack right into your facebook account and abuse it. So, it is necessary to maintain your Facebook profile secure and safe at its maximum.
Well, Facebook is additionally concerned concerning the Privacy and Security of its users. For this reason, it has supplied lots of Security options to maintain your profile totally safeguarded and secure. We need to correctly adjust our Facebook Privacy settings. So, today's post is all committed to the step to keep our Facebook account completely safe.

How To Set Your Profile To Private On Facebook
Below are some points and Facebook Privacy settings you need to transform in your Facebook profile to keep it safe and protected. Simply, comply with the steps and prevent your profile from the hackers and burglars.
Action 1: Security and login
We will begin with the most important aspect for maintaining the Facebook account protected. This step consists of the Security and login settings you can modify to make sure that nothing else individual could get into our Facebook account and abuse it. Facebook has actually supplied several Security steps through which you could prevent any type of burglar or cyberpunk to log into your account without your approval. and these are as complies with:-.
Two-factor authentication
This is the most crucial Facebook setting that you could trigger to stop login of other individuals in your absence to your Facebook account. You can set two-step authentication which includes extra Security layer in the login. If you enable this function then each time you log in to your Facebook from a different computer or web browser after that it will ask you to get in the verification code sent out to your registered mobile phone making sure that it is you that is logging right into your Facebook profile. The entire procedure goes as adheres to.
- Very first login to your Facebook account.
- Currently click on the upside down triangular icon on top right edge of the Facebook major home window and pick the settings option from the provided ones.

- Currently you will certainly see at the left sidebar, some tabs are offered. From those tabs, you have to click on the Security and Login.

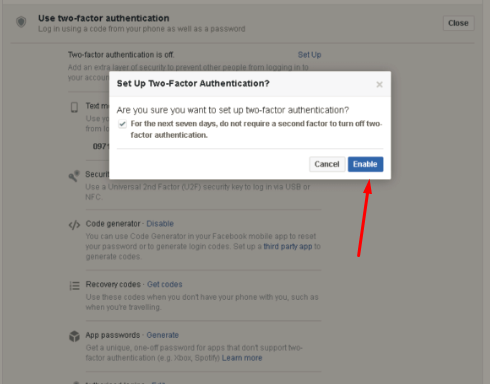
- After that, in the Setting up extra Security, click on the Use Two-factor authentication.

- It uses you many choices such as Security trick, code generator, recuperation codes, text messages. You could choose any of them as they all offer you the code to get in while loging into the account yet by various means. Right here, I'm using the Sms message. Facebook will certainly send an one-time verification code to the signed up mobile number.
- So, click the Enable button available in the Text message panel. Facebook will certainly use the mobile number which you have added to your account. But you can include one more number too. For enabling the two-step.
confirmation, it will certainly ask you to enter your password just for the Security purpose.
Browser Check
This is an additional Security step provided by Facebook. This feature presents you the listing of web browsers or gadgets on which you are presently visited. So, that you could ensure that it is you who is logging in to your Facebook account on various gadgets. Yet if you do not recognize any kind of device or internet browser then log out of that gadget immediately.
- For this, you don't have to most likely to any other control or window as the internet browser choice is readily available in the Security and login tab itself. In the main material of the Security and login tab, seek Where you're logged in panel. and click on it.

- It will certainly show you a complete listing of browsers with active session and some previous logged in as well. Simply examine the listing and if you discover any kind of such browser or gadget which is not acquainted to you then just log out of that device.
- So, if you discover such device then click on the 3 horizontal factors navigating control and afterwards click the sign-out alternative. Your account will be authorized out of that device at that really moment.

So, this was all about secure logging in and protecting against the unapproved logins. In the following sections, we will certainly discuss the actions whereby you can secure your Facebook account to ensure that no stranger could explore your profile, swipe your info or upload some unwanted points on your facebook wall surface. Allow's get going.
Action 2: Hide your Facebook stuff from the unknown people using Facebook Privacy setups
Facebook has actually consisted of Privacy settings option in the account setting of its users. With the help of this Privacy setup, you can hide/show your Facebook photos, standing and so on. Privacy section is split right into 3 panels. We will discuss each one-by-one.

1) The very first panel is Who can see my stuff. Right here you can include Privacy to your Facebook articles. You can make them Public so that everybody on the Facebook can see your articles also he/she is not contributed to your buddy list. But if you intend to make your messages noticeable to just close friends then just pick the Friends alternative. Likewise, if you want to let only specific buddies view your blog post after that pick the.
Also, if you intend to allow only specific pals view your article after that select the Specific friends and define the name of those pals. An additional option includes Friends except ..., this choice lets you show your article to all the pals other than few of them. and if you want to make your blog post restricted to you just, after that just pick Only me choice which will hide your articles from everyone on Facebook also from your friends.

2) Next point is Who can contact me. It is clear by the name that you could tailor the setting for making it possible for just chosen people to send you a friend request.
You could enable everyone on the Facebook to send you the close friend request or you could additionally allow just the friends of your friend to send you the buddy request. So, just click on the Who can contact me in the Privacy setting and afterwards choose the wanted option.

3) The last choice is Who can look me up. Right here you could define that you intend to permit to browse you on Facebook by means of your Email address or mobile number.
If you intend to permit every person on the Facebook to discover you via E-mails or mobile number after that choose the every person option else to select Buddies if you desire just your good friends to look you up via email or mobile.

You could also restrict people to browse your Facebook account with the Internet outside of Facebook such as from Google or elsewhere.
Step 3: Handle your Timeline and Tagging
Timeline and tagging setups of Facebook allows you to regulate the tagging on our timeline. You can do a whole lot in this area. It enables you to enable/disable individuals to publish on your timeline or tag you in some message. So, this prevents some unnecessary or some embarrassing stuff to be uploaded on your timeline without your approval. So, allow's explore this section thoroughly.
The Best Ways To Quit Unwanted Tagging Of Facebook Photos

Enable/disable people to upload on your timeline
1) The first thing you can do this section is to enable/disable people to publish on your timeline. If you don't desire anybody (Amongst your friends) to post something on your timeline then simply most likely to settings >> timeline and tagging >> who can add things to my timeline and after that filter this to Only me. and if you wish to enable your pals to upload on your timeline then just alter it to Friends. Yet no person aside from your pals can publish on your timeline.

Make your timeline blog post noticeable to particular individuals
Right here are 2 things you can do to make our account much more private and safe. It allows you to prevent individuals from seeing the post where you are labelled in and the message what others post on your timeline. You could modify the Privacy of both things to close friends, everyone., buddies of friends, only me or custom. Take help from the image given below to do the same.

After personalizing it you can likewise view your profile deem public or some certain individual. This feature aids you to imagine how your account appears to different people.


