
Privacy and Security of your info and private stuff is the issue of fantastic problem in today's time where people are delighting much more in the on-line digital world. How To Keep Your Facebook Profile Private: Individuals spend a lot of their leisure time on the social media sites sites and the one that has actually taken the social media by storm is Facebook. Over 1 billion are associated with Facebook irrespective of the age. Right here, we share our pictures, play video games, calls, video clips, chat with other individuals and more.
However you will never know when an unidentified individual can enter your account and swipe your photos, videos, other individual information and use them against you. Hackers may quickly hack into your facebook account and abuse it. So, it is required to maintain your Facebook account risk-free and safe at its optimum.
Well, Facebook is additionally worried concerning the Privacy and Security of its individuals. Therefore, it has actually given numerous Security alternatives to maintain your profile completely secured and safe. We have to appropriately change our Facebook Privacy setups. So, today's article is all dedicated to the action to maintain our Facebook profile completely safe and secure.

How To Keep Your Facebook Profile Private
Here are some points and Facebook Privacy setups you ought to transform in your Facebook profile to maintain it secure and safe. Simply, follow the actions and prevent your account from the cyberpunks and intruders.
Step 1: Security and login
We will certainly start with the most crucial factor for maintaining the Facebook account safe. This action includes the Security and login settings you could modify so that no other individual can get into our Facebook account and abuse it. Facebook has actually supplied many Security procedures by which you could prevent any burglar or hacker to log into your account without your authorization. and these are as complies with:-.
Two-factor authentication
This is one of the most vital Facebook setting that you could activate to prevent login of other people in your lack to your Facebook profile. You could establish two-step verification which includes additional Security layer in the login. If you enable this attribute then every single time you visit to your Facebook from a different computer or web browser then it will certainly ask you to enter the verification code sent to your signed up smart phone making sure that it is you that is logging into your Facebook account. The entire procedure goes as complies with.
- Initial login to your Facebook account.
- Currently click the upside down triangle icon at the top right corner of the Facebook main home window and select the settings alternative from the provided ones.

- Currently you will see at the left sidebar, some tabs are readily available. From those tabs, you have to click the Security and Login.

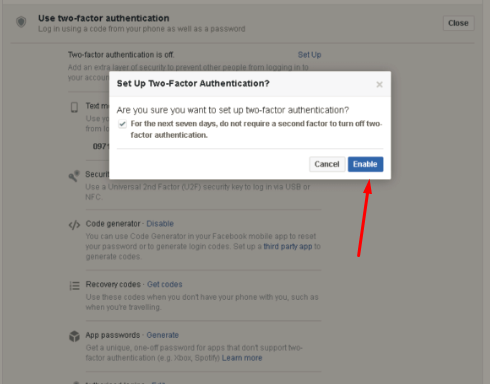
- After that, in the Setting up extra Security, click on the Use Two-factor authentication.

- It provides you many options such as Security key, code generator, recovery codes, text messages. You can pick any one of them as they all supply you the code to go into while loging into the account however by various ways. Right here, I'm utilizing the Sms message. Facebook will send a single confirmation code to the signed up mobile number.
- So, click on the Enable switch available in the Text message panel. Facebook will use the mobile number which you have actually included in your account. But you can include one more number also. For enabling the two-step.
confirmation, it will certainly ask you to enter your password just for the Security purpose.
Web browser Check
This is one more Security procedure provided by Facebook. This feature presents you the listing of browsers or tools on which you are currently logged in. So, that you could make certain that it is you who is logging in to your Facebook account on different tools. Yet if you do not recognize any type of device or internet browser then log out of that device instantly.
- For this, you don't need to most likely to any other control or window as the internet browser alternative is readily available in the Security and login tab itself. Generally content of the Security and login tab, look for Where you're logged in panel. and click on it.

- It will certainly show you a total checklist of web browsers with energetic session and some past visited as well. Simply check the listing and if you locate any kind of such internet browser or tool which is not acquainted to you then merely log out of that device.
- So, if you discover such gadget then click on the 3 horizontal points navigating control and afterwards click on the sign-out alternative. Your account will be signed out of that tool at that very moment.

So, this was everything about secure logging in and avoiding the unauthorized logins. In the following areas, we will certainly review the steps by which you can safeguard your Facebook profile to make sure that no stranger can check out your account, swipe your info or upload some undesirable things on your facebook wall. Allow's begin.
Step 2: Hide your Facebook stuff from the unknown people through Facebook Privacy setups
Facebook has actually included Privacy settings alternative in the account setting of its customers. With the help of this Privacy setup, you can hide/show your Facebook photos, status and so on. Privacy area is divided right into 3 panels. We will review each one-by-one.

1) The very first panel is Who can see my stuff. Below you can include Privacy to your Facebook articles. You can make them Public to make sure that everybody on the Facebook can see your posts even he/she is not included in your buddy list. Yet if you intend to make your articles noticeable to only good friends after that merely pick the Friends choice. Also, if you wish to allow only certain buddies view your article after that pick the.
Additionally, if you want to allow only certain close friends watch your article then pick the Specific friends and specify the name of those buddies. One more alternative includes Friends except ..., this alternative lets you reveal your message to all the buddies other than few of them. and if you want to make your blog post limited to you just, then simply select Only me alternative which will hide your articles from everyone on Facebook even from your good friends.

2) Following thing is Who can contact me. It is clear by the name that you could tailor the setting for enabling just selected people to send you a friend request.
You could allow everyone on the Facebook to send you the friend request or you can likewise allow only the friends of your friend to send you the good friend demand. So, simply click on the Who can contact me in the Privacy setting and then pick the desired choice.

3) The last choice is Who can look me up. Below you can specify that you intend to enable to search you on Facebook via your Email address or mobile number.
If you want to enable everyone on the Facebook to locate you with E-mails or mobile number after that choose the everyone alternative else to select Pals if you want just your close friends to look you up through email or mobile.

You could even limit individuals to browse your Facebook profile with the Web beyond Facebook such as from Google or somewhere else.
Step 3: Manage your Timeline and Tagging
Timeline and tagging settings of Facebook allows you to manage the tagging on our timeline. You can do a great deal in this section. It enables you to enable/disable people to upload on your timeline or tag you in some article. So, this stops some unnecessary or some humiliating stuff to be uploaded on your timeline without your authorization. So, let's discover this area carefully.
The Best Ways To Quit Unwanted Tagging Of Facebook Photos

Enable/disable people to post on your timeline
1) The first thing you can do this area is to enable/disable people to post on your timeline. If you do not desire anyone (Amongst your good friends) to post something on your timeline then simply go to settings >> timeline and tagging >> who can add things to my timeline and then filter this to Only me. and if you want to permit your friends to post on your timeline after that just transform it to Friends. However no individual other than your buddies could upload on your timeline.

Make your timeline article visible to specific individuals
Below are two points you can do to earn our account extra private and safe and secure. It allows you to stop individuals from seeing the blog post where you are marked in and the post what others publish on your timeline. You can modify the Privacy of both things to buddies, everyone., buddies of good friends, just me or customized. Take assistance from the image given below to do the same.

After customizing it you can likewise see your profile consider as public or some particular individual. This feature assists you to picture just how your account shows up to various people.


